What Is Tube Packaging? The Ultimate Guide

Founder of UKPACK, chief packaging engineer and designer with 18 years of experience, and Red Dot Award winner. I work on cosmetic packaging structure, material selection, mold feasibility, decoration processes, and leak-risk control, helping brands turn packaging ideas into reliable production-ready solutions. See my senior packaging engineer qualification.

- What Is Tube Packaging
- Where Tubes Win vs Bottles and Jars
- Why Brands Use Tube Packaging
- Tube Packaging Types Explained
- Tube Anatomy and Components
- Materials and Barrier Layers
- How Tube Packaging Is Made
- Decoration and Printing Methods
- Filling and Sealing
- How to Choose the Right Tube for Your Formula
- Quality Control and Testing Checklist
- Costs, MOQ, Lead Times, and Tooling
- Conclusion
- FAQs About Tube Packaging
In recent years, tube packaging has expanded far beyond cosmetics.
You now see tubes used for industrial products like lubricants, sealants, and caulks, for foods like mustard and chilli sauce, and for pharmaceutical ointments, while toothpaste tubes continue to evolve with better barrier and dispensing designs.
In the beauty world, tubes remain a go-to format because they are easy to squeeze and use, lightweight for shipping and travel, and highly flexible for custom sizes, closures, and full-body printing.
In this ultimate guide, we will break down what tube packaging is, the main tube types and structures, how tubes are made and decorated, and the key buying factors that determine performance on your filling line and over your product’s shelf life.
What Is Tube Packaging
Tube packaging is a flexible, squeezable container that dispenses a controlled amount of product through a small opening and closes with a cap or applicator.
Most tubes are built from PE plastics, laminated films, or aluminum-based laminates, produced through co-extrusion or lamination and then formed into a tube on dedicated tube-making equipment.
Because the package collapses as you squeeze, it stays clean in use and supports precise, repeatable dosing.
It’s widely used for creams, gels, pastes, ointments, condiments, and adhesives across beauty, personal care, food, pharma, and industrial applications.
Where Tubes Win vs Bottles and Jars
Tube packaging is often the better choice when you need controlled dispensing, easy portability, and more efficient shipping.
- Controlled dispensing: A tube gives clean, repeatable output through a defined orifice or tip. That helps reduce overuse and mess, especially for creams, gels, and paste-like formulas.
- Portability and durability: Tubes are lightweight, pack easily, and are less fragile than many rigid packs. They’re a common go-to for travel sizes and daily carry products.
- Lower shipping volume: Tubes typically use less material than jars and take up less space in cartons. For bulk orders, that can improve packing efficiency and help reduce freight cost per unit.
Why Brands Use Tube Packaging
Tube packaging is a popular format for beauty and personal care because it improves the user experience, simplifies logistics, and offers strong branding flexibility.
- User experience: Tubes support one-hand squeeze dispensing with clean, repeatable dosing. That makes application easier and reduces mess compared with wide-mouth formats.
- Supply chain efficiency: Tubes are lightweight, pack tightly in cartons, and typically reduce breakage risk versus glass. For scale programs, that can improve shipping efficiency and lower freight cost per unit.
- Branding flexibility: A tube gives you a large, continuous decoration area for full-body printing and finishes like matte or gloss. You can also upgrade shelf impact with premium caps, tips, and applicator styles.
Tube Packaging Types Explained
Most cosmetic tubes fall into three build families.
The right choice depends on required barrier (oxygen, moisture, aroma), decoration stability, and filling-line risk factors like seams and sealing performance.
Extruded Plastic Tubes (Single-Layer PE)
Single-layer PE tubes are formed in one continuous layer by extrusion.
They’re commonly used for fast-moving, lower-barrier products where appearance and cost control matter more than long-term protection.
Co-Ex Tubes (Multi-Layer Co-Extrusion)
Co-ex tubes are formed by co-extruding multiple plastic layers in a single step.
They can be engineered as multi-layer builds for higher-end formulas, including improved protection versus single-layer PE without relying on a laminated side seam.
Laminated Tubes
Laminated tubes are made from a layered sheet that’s formed into a tube and sealed along a side seam.
They’re often chosen when you need stronger barrier performance and more stable, high-resolution decoration.
ABL (Aluminum Barrier Laminate)
ABL tubes use an aluminum foil barrier layer and are widely selected for formulas with higher hygiene and barrier requirements.
A typical structure is PE / (PE+EAA) / AL / (PE+EAA) / PE, where EAA acts as a tie layer to bond plastic to foil.
Barrier performance is strongly influenced by foil pinhole control, and modern ABL designs have reduced foil thickness from about 40 μm to around 12 μm, and in some cases even 9 μm, improving material efficiency without giving up the core barrier function.
PBL (Plastic Barrier Laminate)
PBL tubes are all-plastic laminates and can be built as non-barrier or barrier structures depending on shelf-life needs.
Barrier PBL commonly uses layers such as EVOH, PVDC, or coated films like oxide-coated PET, for example PE / PE / EVOH / PE / PE.
Because laminated tubes typically include a side seam, seam quality becomes a key control point for both appearance and barrier consistency.
Aluminum Tubes
Aluminum tubes are used more often for pharmaceutical ointments and certain industrial pastes.
They offer naturally strong barrier protection, but they can dent more easily and usually have narrower decoration and aesthetic options than plastic-based tubes.
Tube Anatomy and Components
Before you choose a tube type, you need to be clear on the tube’s anatomy.
The same formula can perform very differently depending on the head design, orifice size, cap fit, and tail seal execution.
Tube Parts: Shoulder / Body / Orifice / Head / Tail Seal
Shoulder: The shoulder connects the tube body to the dispensing head. It’s a structural “fit point” that affects leak risk and overall stability.
Body (tube wall): The body holds the product and carries most of the decoration. In production, the tube body goes through multiple heat steps, which can cause slight shrinkage, so tube diameter and length are typically specified within an acceptable tolerance range rather than as a single fixed value.
Orifice: The orifice is the opening that controls flow. Its diameter is one of the biggest drivers of user experience, especially for thick formulas.
Head (dispensing area): The head includes the neck and tip geometry around the orifice. It determines how cleanly the product dispenses and how well the cap seals back down.
Tail seal (crimp/seal end): The tail is sealed after filling on most cosmetic programs. Common sealing styles include straight, diagonal, umbrella-style, and custom profiles, and date codes can be printed on the tail area when required.
Cap and Dispensing Options
Screw caps: Common, secure, and easy to engineer for leak control. Premium versions often use double-wall cap builds or plated looks.
Flip tops: Faster for daily use and good for shower products. Hinges and closure snap feel are key quality points.
Nozzle tips: Used for precise application and controlled flow. Often chosen for spot treatments, hair color, and products where placement matters.
Spatula caps: Combine dispensing and application in one component. Useful for masks and thicker textures where spreading is part of the experience.
Roller / massage heads: Add a functional “applicator moment” to support premium positioning. They also introduce tighter tolerance requirements for sealing and assembly.
What Parts Matter Most
Sealing performance: Focus on the full seal chain: orifice + cap liner (if used) + thread fit + tail seal. If any one of these fit points is off, leak risk increases in storage, transit, or consumer use.
Dispensing experience: The biggest drivers are orifice diameter, tip shape, and how well the design prevents backflow and mess around the opening. This is where “feels premium” or “feels cheap” is often decided.
Production risk points:
- Shoulder-to-body weld/fit: a critical structural junction that impacts leak performance and reject rate.
- Tail seal window: sealing temperature, pressure, and time must match the tube structure to avoid weak seals or distorted tails.
- Cap torque: too loose risks leaks, too tight hurts usability and can damage threads during assembly.
Materials and Barrier Layers
Tube performance is largely decided by the material structure.
The same tube can look identical on shelf, but barrier layers determine how well it protects your formula from oxygen, moisture loss, and fragrance/solvent migration over time.
Core Materials You’ll See Most Often
PE and PP are the most common polymers used in tube bodies and caps.
For U.S.-market programs, brands often ask suppliers to reference applicable federal material regulations as part of their compliance review.
A commonly cited reference for olefin-based polymers is 21 CFR 177.1520 (Olefin polymers).
What Barrier Layers Actually Do
Barrier layers are added when a formula is sensitive or when shelf life targets are higher.
Oxygen barrier: Helps protect oxidation-sensitive actives and reduces color/odor changes over time. This is a common reason brands choose ABL or barrier PBL structures.
Aroma and volatile retention: Helps keep fragrance profiles stable and reduces loss of volatile ingredients. This matters for scented skincare, hair color, and solvent-containing products.
Moisture protection: Helps prevent water loss in long storage cycles and reduces weight loss over time for certain formulas.
Common Barrier Options in Cosmetic Tubes
Aluminum foil (ABL): A strong barrier layer used in laminated tubes. Barrier performance depends heavily on foil quality and pinhole control, not just thickness.
EVOH (plastic barrier layer): A widely used barrier layer in PBL or co-ex structures. Typical barrier laminate examples include PE / PE / EVOH / PE / PE.
PVDC and coated films (e.g., oxide-coated PET): Used in some barrier laminate designs when specific performance targets are needed. These options are often selected based on shelf-life needs and formula behavior.
How to Think About Barrier Selection
If your product is oxygen-sensitive, fragrance-heavy, or solvent-active, start by defining the protection target first, then choose the tube structure.
That means you align the barrier choice with the formula risk, the desired shelf life, and the realities of your filling and sealing process.
How Tube Packaging Is Made
Tube production is a sequence of forming, decorating, and sealing steps, and each step has its own control points.
If you’re evaluating a supplier, ask what is handled in-house versus outsourced, how in-process checks are run, and what standards are used to lock repeatability from samples to mass production.
For a closer look at equipment coverage, process controls, and QC checkpoints, see our manufacturing capabilities.
Tube Production Process Map

Exact steps can vary by tube structure (single-layer, co-ex, ABL, PBL) and decoration plan.
A Typical Tube-Making Workflow
Material prep and mixing: Resin and color masterbatch are blended to hit the target appearance and processing behavior.
- Tube forming: The tube body is formed by extrusion, co-extrusion, or from a laminated sheet depending on the structure.
- Heading and orifice forming: The shoulder and head are formed and joined to the body, creating the dispensing area around the orifice.
- Printing and surface finishing: Decoration is applied through processes like offset printing, screen printing, and surface coating. These steps often include drying, oven passes, or UV curing.
- Secondary effects and premium decoration: Options like foiling can be added when required by the design.
- Tail sealing: Tubes are typically filled later and sealed at the tail on the filling line, but tube manufacturing still prepares the tail area for consistent sealing performance.
- Cap production and assembly: Caps are injection molded in a separate process, then assembled and torque-checked during final packing.
- Packing: Finished tubes are packed to protect decoration, prevent deformation, and reduce leak risk in transit.
What the Process Flow Chart Helps You Understand
- Why tolerances matter: Multiple heating and curing steps can cause small shrinkage shifts, so tube diameter and length are controlled within an acceptable range.
- Why decoration needs testing: Printing, coating, and curing happen in stages, which is why adhesion, rub resistance, and fold-crack performance must be verified.
- Why caps need their own QC: Cap fit and torque control are critical, and caps are often made on a different line than the tube body.
Decoration and Printing Methods
Tube decoration is where brand impact is created, but it’s also where many projects fail if artwork rules are ignored.
The tube body is flexible, it gets squeezed and folded in use, and it goes through curing and heat steps in production, so your decoration plan has to match both the design and the manufacturing reality.
Surface Finishes (Tube Look and Feel)
Tubes can be produced as colored or clear bodies, with options like frosted (matte), pearlescent effects, and UV gloss or soft-matte looks.
The finish you choose should match real-world handling, because matte and specialty coatings can show scuffs faster if durability isn’t validated.
For a full list of finish options and what they look like in production, see surface finishes and decorations.
Printing Methods
- Screen printing: Best for spot colors and smaller color blocks where you want strong ink coverage and a premium feel. It usually requires color-by-color registration control.
- Offset printing: Better for full-color artwork, gradients, and larger image areas. Many tube programs use UV-curable inks, so adhesion and color stability must be verified.
- Foil stamping (gold/silver) and special effects: Used to elevate shelf presence. Always confirm feasibility on the selected tube material and finish, since foils and coatings can change rub resistance and crease behavior.
Artwork Checklist (Prepress)
This is the part that protects your project from expensive reprints.
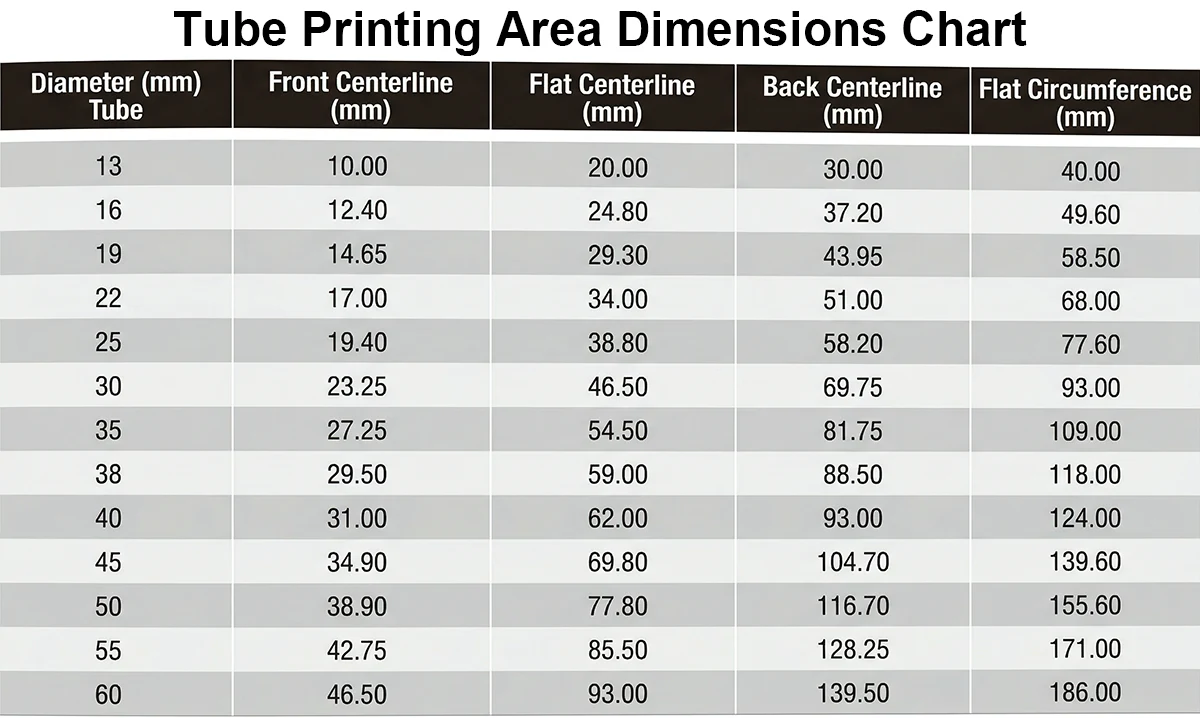
a. Start from the correct layout references: Use the tube diameter reference to locate the front center line, back center line, and flat layout center line before building your design.
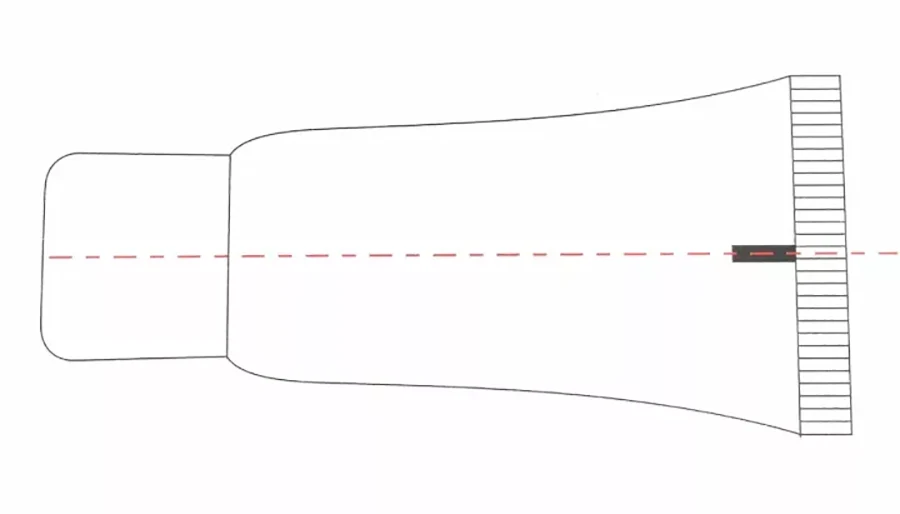
b. Lock your center lines and positioning marks: Translate the center-line references onto the actual tube so the artwork orientation is consistent on press.
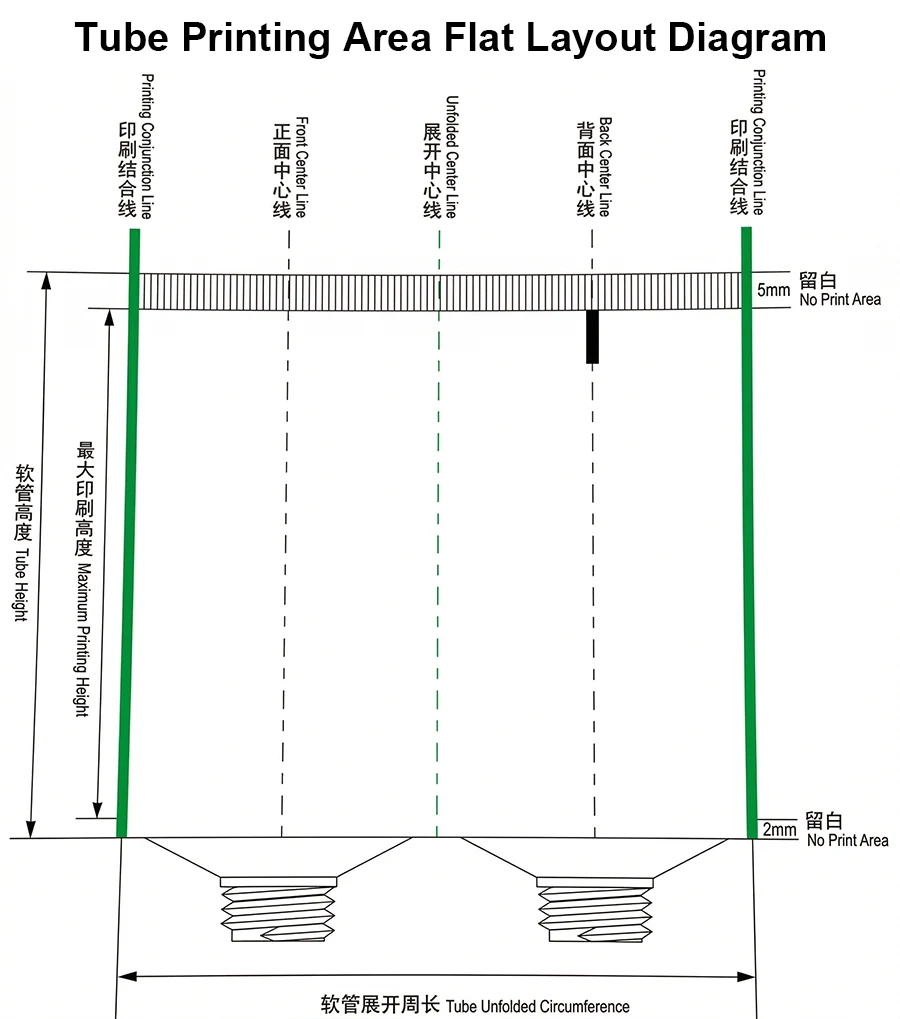
c. Respect the seam and no-print margins: The flat layout should clearly mark the printing combination line (seam line) and the no-print areas at the top and bottom. This prevents critical artwork from landing on the seam or too close to sealing zones.
d. Registration control is a real spec: Set clear expectations for overprint and trapping, and control registration tightly. A typical benchmark is that registration deviation should be kept within 0.2 mm for clean text and tight graphics.
e. Barcode and small text rules: Make sure barcode direction and contrast support reliable scanning, and keep small text away from high-deformation zones where the tube will fold and crease.
f. Preflight basics that still cause failures: Convert fonts to outlines, confirm color targets, and validate that the selected processes can actually reproduce the design on a flexible substrate.
Practical Failure Modes to Watch For
- Ink rub-off or poor adhesion: Heavy handling, oils, and friction can reveal weak adhesion quickly, especially with certain coatings and matte finishes.
- Fold-cracking and whitening: Tubes are squeezed and folded repeatedly. If ink and coatings are not compatible with that deformation, cracks and whitening can appear in the fold zone.
- A quick diagnostic for heavy surface printing: If the tube uses large-area surface printing, the tail cut edge often appears white. These tubes typically need higher ink performance, otherwise the decoration may show cracking or white marks after repeated use.
Filling and Sealing
Filling and sealing decisions should be locked early.
They affect tube selection, head/orifice design, decoration durability, and your line efficiency.
Two Filling Methods: Tail Filling vs Mouth Filling
- Tail filling (most common for cosmetics): Product is filled through the open tail, then the tail is sealed. This method is efficient for mass production and works well for a wide range of viscosities.
- Mouth filling (through the orifice/head): Product is filled from the top opening. If you use mouth filling, you must confirm that the orifice size matches your filling nozzle and that the nozzle can insert smoothly without damaging the tube or contaminating the sealing surfaces.
Heat Fill vs Room Temperature Filling
Your formula and process temperature matter as much as the tube type.
- Heat fill can increase risk around tube shrinkage, decoration stress, and sealing consistency, especially when the tube body has already been through multiple curing or heat steps during manufacturing.
- Room temperature filling is generally easier to control, but you still need to confirm viscosity behavior and clean cut-off to avoid mess at the orifice.
Tail Sealing Styles and Date Coding
After tail filling, the tube is sealed at the tail end.
Common tail seal patterns include straight, diagonal, umbrella-style, and custom profiles.
If required, date codes or batch codes can be printed on the tail seal area for traceability.
Line-Matching Checklist (What to Confirm Before You Order)
- Filling direction: tail fill or mouth fill
- Nozzle match: orifice diameter vs nozzle diameter and insertion depth
- Formula condition: heat fill or room temperature; target temperature range
- Viscosity range: expected flow behavior and whether the tip design supports clean cut-off
- Sealing window: sealing method and parameter window (time, pressure, temperature) aligned to tube structure
- Cap fit and torque: target torque range for leak control and usability
- Packing orientation: how tubes will be oriented in cartons for filling speed and handling efficiency
How to Choose the Right Tube for Your Formula
Tube selection should start with the formula risk, not the tube look.
If you define what the formula needs to be protected from and how it must dispense, the “right” tube structure becomes much easier to choose.
Start With These 3 Inputs
1) Formula sensitivity: Is it oxygen-sensitive, fragrance-heavy, solvent-active, or chemically aggressive (acids, salts, high essential oil load)? Higher sensitivity usually means you need a stronger barrier structure and tighter compatibility validation.
2) Viscosity and dispensing behavior: Is the product a gel, cream, paste, or thick balm? Thicker formulas usually require a larger orifice or a nozzle-style head to avoid user frustration, mess, and backflow.
3) Your filling and sealing process: Tail filling or mouth filling? Heat fill or room temperature? These decisions affect head/orifice design, sealing window, and decoration durability.
Quick “Choose-What” Table (Formula-First)
| Formula / Requirement | Typical Tube Choice | Why | What to Confirm |
|---|---|---|---|
| Basic creams and daily fast movers | Single-layer PE | Cost-effective, easy squeeze | Decoration durability in fold zone |
| Higher-end skincare needing better stability | Multi-layer co-ex | Better performance than single-layer | Barrier level and compatibility validation |
| Oxygen-sensitive actives / longer shelf-life targets | ABL or barrier PBL | Stronger barrier protection | ABL: foil pinhole control; PBL: barrier layer design and seam quality |
| Strong fragrance / volatile loss risk | ABL (often) or barrier PBL | Better aroma retention | Aroma stability testing over time |
| Solvent-active / essential oil heavy systems | Case-by-case (often barrier structures) | Migration risk is higher | Compatibility aging, stress cracking, odor transfer |
| Mouth filling constraints | Match head/orifice to your line | Nozzle and insertion matter | Orifice diameter vs filling nozzle + insertion depth |
| Heat fill process | Prefer stable structures + verified decoration | Heat adds risk | Heat cycle testing for size + print + seal integrity |
Compatibility and Aging Validation (Do This Before Mass Production)
If the formula is even moderately sensitive, validate performance with real checks, not assumptions.
- Compatibility aging: Store filled samples at elevated temperature and room temperature to check deformation, odor change, discoloration, softening, or stress cracking.
- Leak and seal integrity: Inversion storage, squeeze cycling, and temperature cycling to confirm the seal chain: orifice/cap fit plus tail seal performance.
- Decoration durability: Rub resistance and fold testing on the printed tube body to catch cracking, whitening, or ink failure in the high-deformation zone.
- Line simulation: Confirm nozzle fit (especially for mouth filling), sealing window, and cap torque targets before committing to full production.
Quality Control and Testing Checklist
Tube projects fail most often on leaks, decoration durability, and formula compatibility.
A good QC plan catches those risks before you commit to mass production and before products ship.
Pre-Production Approval (Before Mass Production)
- Golden sample sign-off: Confirm tube type, diameter/length range, finish, and cap style against your approved sample.
- Artwork and color approval: Approves layout orientation, center lines, seam/no-print areas, and final color targets before plates/cylinders are locked.
- Cap fit and torque target: Define a torque range that balances leak control and usability, then confirm it on real assemblies.
- Filling and sealing alignment: Confirm tail filling vs mouth filling, nozzle fit (if mouth filling), and the sealing method/window that will be used on the line.
In-Process Checks (During Production)
- Dimensions and visual control: Check key dimensions against the agreed tolerance range and confirm no deformation in the shoulder, body, or tail areas.
- Seam inspection (laminated tubes): For ABL/PBL, inspect the side seam for consistency and cosmetic defects that could impact performance or appearance.
- Print registration and clarity: Verify registration alignment during printing runs. If your spec requires tight graphics, keep registration deviation within the target range (commonly controlled around 0.2 mm).
- Ink adhesion and rub resistance: Run quick rub and tape-style checks to confirm inks and finishes are bonded properly before the full batch continues.
Finished Goods Tests (Before Shipment)
- Leak checks: Inversion storage checks and basic squeeze checks to verify the full seal chain: orifice/cap fit plus tail seal integrity.
- Squeeze cycling (real-use simulation): Repeated squeeze-and-release cycles to expose backflow mess, cap loosening, and fold-zone decoration cracking.
- Decoration durability: Rub testing and fold testing to check for ink cracking, whitening, or flaking in the high-deformation area.
- Transport robustness: Drop and vibration-style checks based on your shipping reality (carton pack style, stacking, transit distance).
- Barcode and readability: Confirm barcodes scan reliably and small text stays legible on curved, flexible surfaces.
Compatibility and Aging Tests (Formula Validation)
- Accelerated aging: Hold filled samples at elevated temperature plus room temperature to check for discoloration, odor change, softening, or deformation.
- Temperature cycling: Cycle between hot and cold conditions to stress the seal points and reveal leaks or material instability.
- Stress cracking and migration checks: Especially important for solvent-active or essential-oil-heavy systems. Look for embrittlement, cracking, swelling, or odor transfer.
Costs, MOQ, Lead Times, and Tooling
Tube pricing is not just “tube vs tube.”
Cost is driven by structure, decoration, and the components you pair with the tube, plus the one-time setup work needed to run your artwork consistently.
What Drives Cost
- Tube structure: Single-layer PE is usually the most cost-efficient. Multi-layer co-ex, ABL, and barrier PBL typically cost more because they add functional layers, tighter controls, or lamination steps.
- Diameter and length (material usage): Larger diameters and longer tubes use more material and usually increase cost per unit.
- Decoration complexity: More colors, tighter registration, heavy ink coverage, coatings, and premium effects (like foils) increase cost and process time.
- Finish and special effects: Matte, soft-touch, pearlescent, and coated looks may require additional process control and durability validation.
- Caps and applicators: Standard screw caps are usually lower cost than flip tops, nozzle tips, spatula caps, rollers, or massage heads. Premium caps often add cost through materials, finishing, and tighter fit requirements.
Typical MOQ Logic (What to Expect)
- MOQs are usually driven by efficiency, not preference: Tube body production runs, printing setup, and cap sourcing all have practical minimums.
- One SKU vs multi-SKU planning: If you plan several SKUs, aligning tube diameter, cap family, and decoration method often helps you reach MOQs faster and control cost.
- Standard parts vs custom parts: Using standard tube diameters and common caps generally lowers MOQ and improves lead time. Custom caps or unique structures typically raise both.
Lead Times (How the Timeline Usually Breaks Down)
- Artwork confirmation: Final layout approval, color targets, and print method selection.
- Sampling: Sample builds verify appearance, fit, and basic functionality before mass production.
- Mass production: Tube forming, printing/finishing, assembly, and packing.
- Shipping and delivery: Packing method and transit route will affect final lead time.
Tooling and One-Time Fees
Common one-time costs can include:
- Printing setup: Plates/cylinders depending on printing method.
- Foil tooling (if used): Hot stamping tools are typically charged as a separate setup item.
- Custom components: Custom caps, applicators, or special head designs may require new tooling.
- Sampling and approvals: Some programs include sampling within project setup, while others charge it separately depending on complexity.
Commercial Details Buyers Often Miss
- Over/under delivery tolerance: Tube orders often ship with a quantity tolerance rather than an exact piece count. A common industry range is ±10%, so clarify this in your purchase terms.
- Repeat-order consistency: Lock your “golden sample,” printing method, and key specs early so reorders match the first approved batch.
- Color drift management: If color consistency is critical, define measurable references and approval rules so “close enough” does not become a dispute later.
Conclusion
Tube packaging looks simple on the outside, but performance is engineered.
The right tube is the one that matches your formula risk, dispensing behavior, decoration plan, and filling process, not just your desired look.
Start by choosing the correct structure (single-layer, co-ex, ABL, or PBL), then lock the head/orifice and cap fit, and validate everything with real-world checks like leak testing, squeeze cycling, decoration durability, and compatibility aging.
When you treat tolerances, seams, pinhole control, and sealing windows as part of the spec, tube packaging becomes a reliable, scalable format that protects your product and delivers a clean user experience.
FAQs About Tube Packaging
1. What is tube packaging used for?
Tube packaging is used for creams, gels, pastes, and other squeeze-dispensed products where clean dosing and portability matter, including cosmetics, personal care, pharma ointments, food condiments, and industrial sealants.
2. What’s the difference between ABL and PBL tubes?
ABL uses an aluminum foil barrier layer for strong protection.
PBL uses an all-plastic laminate structure, which can be built with or without barrier layers such as EVOH.
3. When should I choose a barrier tube?
Choose a barrier tube when your formula is oxygen-sensitive, fragrance-heavy, volatile, or requires longer shelf-life stability.
4. Are co-ex tubes better than laminated tubes?
Not always.
Co-ex tubes can deliver strong performance without a laminated seam, while laminated tubes are often chosen for high barrier needs and stable decoration. The best option depends on your barrier targets and project constraints.
5. Can tube packaging be recyclable?
It depends on local recycling systems and the tube structure.
All-plastic directions (like certain co-ex or PBL builds) can support better recyclability narratives than mixed-material structures, but decoration and components also matter.
6. How do I choose the right tube diameter and length?
Start from your target fill volume, viscosity, and how the product should dispense.
Then confirm the tube’s practical print area, sealing zones, and whether your filling line needs tail filling or mouth filling.
7. What’s the difference between tail filling and mouth filling?
Tail filling fills through the open tail and seals after filling, and it’s the most common method for cosmetics.
Mouth filling fills through the orifice/head and requires close matching between the filling nozzle and the orifice design.
8. What causes tube leaking in transit?
Common causes include poor cap fit or torque control, weak tail seals, head-to-body fit issues, or deformation from packing and temperature exposure.
9. Why does tube printing crack or turn white after use?
Tubes flex and fold during squeezing.
If ink adhesion and coating selection don’t match that deformation, cracking and whitening can show up in the fold zone, especially on heavily printed tubes.
10. What tests should I require before mass production?
At minimum: leak checks, squeeze cycling, decoration rub and fold testing, and compatibility aging for the filled formula.
If you ship long distances or through temperature swings, add transport and temperature cycling checks.
11. What are typical lead times for tube packaging?
Lead times depend on structure, decoration complexity, and whether you use standard or custom components.
In practice, timelines include artwork approval, sampling, mass production, packing, and shipping.
12. Why do tube orders sometimes ship with a quantity tolerance?
Tube orders often include an over/under delivery tolerance due to production yield and packing realities.
Confirm the tolerance in your purchase terms early (a common range is ±10%).