Screen Printing on Plastic Packaging: What You Need to Know

Founder of UKPACK, chief packaging engineer and designer with 18 years of experience, and Red Dot Award winner. I work on cosmetic packaging structure, material selection, mold feasibility, decoration processes, and leak-risk control, helping brands turn packaging ideas into reliable production-ready solutions. See my senior packaging engineer qualification.

Screen printing on plastic packaging can look deceptively simple. You load a bottle onto a machine, pull ink through a mesh, and a clean logo appears on the front. From a distance, it feels like a straightforward way to get color and branding onto a bottle or jar.
If you are responsible for packaging in a beauty or personal care brand, you already know there is more to it. Choose the wrong ink and the print wipes off under an alcohol swab. Ignore the base material and your logo starts to peel after a few weeks in a steamy bathroom. Push for a six-color design on a small oval bottle and your unit cost and lead time can climb fast. This guide steps through how screen printing on plastic really works for cosmetic packaging, when it is the right choice, how to design artwork that actually prints, and what to expect when you brief a manufacturer like UKPACK.
What Is Screen Printing on Plastic Packaging?
Screen printing is a printing process that uses a mesh screen, a stencil and a squeegee to transfer ink directly onto a substrate. When we talk about screen printing on plastic packaging, that substrate is usually a bottle, jar, tube or closure made from materials like PP, PE, PET, PETG, ABS or AS. Ink passes through the open areas of the stencil and deposits a controlled layer of color onto the plastic surface.

Unlike a pressure-sensitive label or shrink sleeve, screen printing becomes part of the pack itself. There is no label edge, no additional film, and no risk of a label wrinkling or lifting at the corners. For many beauty and personal care brands, this direct-printed look is associated with higher perceived value. A minimalist logo on a frosted lotion bottle or a subtle shade name printed on a clear serum bottle often reads as more premium than a separate label.
Screen printing also gives you a tactile element. Because the ink layer is comparatively thick, the print can be felt under the fingertips. For some brands that is a deliberate design choice: the raised logo or lettering reinforces the sense of quality when a consumer picks up the pack.
How Does Screen Printing Work on Plastic Bottles & Jars?

Screen printing follows the same basic principles on most plastic packaging, even if the machines and fixtures look different from plant to plant. Understanding the core steps helps explain why artwork needs to be built a certain way and why some bottle shapes are simpler than others.
Basic step-by-step process
Every job starts with artwork. The design team prepares vector files with each color separated into its own layer. Those color separations are then used to create screens: mesh stretched over a frame, coated with a light-sensitive emulsion. The areas that should print are exposed and hardened, while the non-image areas remain closed to ink.
On the production line, bottles or jars are fed into a screen printing machine and held in place by fixtures tailored to the specific shape. A measured amount of ink is flooded across the screen. As the squeegee moves across, it presses the ink through the open mesh and onto the plastic surface within the defined print area. For round bottles, the bottle often rotates under the screen so that a 180° or 360° design can be printed in a single motion.
After printing, the ink must be cured or dried. Solvent-based inks flash off their solvent and may pass through a heated tunnel. UV-curable inks pass immediately under UV lamps that crosslink the ink in a fraction of a second. Once cured, the bottles are cooled if necessary and then transferred to inspection, packing and any further processes like hot stamping or assembly.
Each color is usually printed in a separate pass with its own screen, especially when tight registration is required. That is why color count has a real impact on set-up time, line speed and cost. Tight multi-color work needs careful alignment between screens, stable fixtures and controlled machine parameters.

Round vs oval and special fixtures
Round bottles are generally the most forgiving for screen printing. A simple rotary screen printing unit can spin the bottle under the screen, delivering a consistent ink deposit around the circumference. Registration between front and back images is still important, but the mechanical motion is relatively straightforward.
Oval or highly contoured bottles need more careful handling. Instead of rotating smoothly, they may need to rock or index under the screen to maintain proper contact between the mesh and the surface. Fixtures have to locate the bottle the same way every time, so print position does not wander from one piece to the next. If the design wraps too far around the shoulder or down into a strong curve, the risk of distortion and uneven ink deposit increases.
Closures bring their own challenges. Printing on curved caps, airless pump actuators or very small component faces can require custom tooling and tighter process windows. These realities do not mean you cannot print them, but they do explain why your supplier may push back on certain design ideas or propose a modified print area during early discussions.
Why Beauty Brands Use Screen Printing on Plastic Packaging
Beauty and personal care brands come to screen printing for specific reasons. It is not just because “everyone else is doing it.” When the process is well matched to the project, it offers a balance of visual impact, durability and cost that fits many core products.
The first driver is visual quality. Screen printing lays down a relatively thick, opaque ink film in one pass, which is ideal for solid logos, bold typography and simple icons. On frosted or tinted bottles, screen print can create strong contrast so brand names and claims remain legible at arm’s length. On clear bottles and jars, it can frame the formula without completely hiding it. Metallic and special-effect inks can also be used, but those are often combined with hot stamping or coatings for best effect.
If you are deciding whether to use screen printing or hot stamping on cosmetic bottles and jars, our guide to screen printing vs hot stamping on cosmetic packaging walks through the trade-offs in detail.

Durability is the second key reason. Cosmetic and personal care packs live in bathrooms, showers and handbags where they are handled frequently and exposed to moisture, heat and chemicals from other products. A properly specified ink and curing system will resist water, mild detergents, limited alcohol exposure and general abrasion for the full life of the product. That is harder to achieve with some low-cost labeling approaches.
The third reason is flexibility across packaging formats. The same basic screen printing technology can be tuned for airless pump bottles, standard lotion bottles, squeeze tubes, jars and even some closures. A brand can apply a consistent logo and typography system across several SKUs and pack formats while still tailoring colors or accents by line.
Finally, when volumes are right, screen printing offers attractive unit economics. Once screens are made and the line is set up, cost per piece for a one- or two-color design on a few core SKUs can be very competitive. That is why you see so many successful skincare and haircare lines using direct screen print on their main bottles and jars, especially in mid to high volume ranges.
Screens, Inks and Plastic Materials: Getting the Combination Right
From a manufacturing perspective, screen printing is not just “machine plus ink.” The screen, ink system, plastic material and any surface pretreatment have to work together. When one link in that chain is wrong, adhesion issues, poor coverage or premature failure are almost guaranteed.
Matching ink systems to common cosmetic plastics
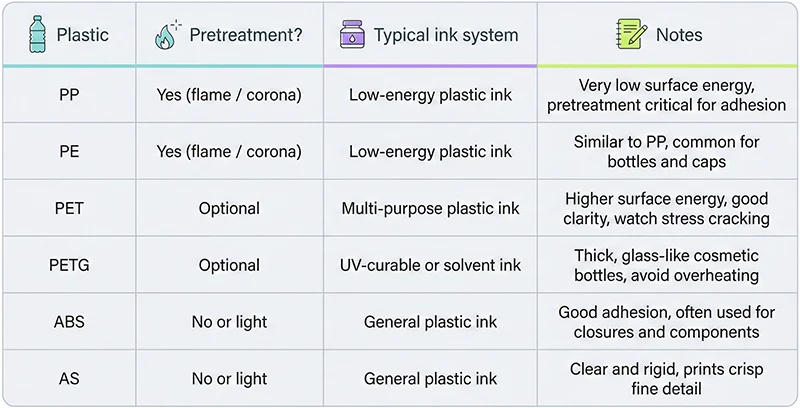
Most cosmetic and personal care packaging is built around a few common plastics. Each reacts differently to screen printing.
Polypropylene (PP) and polyethylene (PE) are widely used for lotion bottles, shampoo bottles, tubes and caps. They are tough and chemically resistant, but they have low surface energy, which makes ink adhesion more challenging. In practice, this means they almost always require surface pretreatment before printing and careful selection of an ink system designed for low-energy plastics.
PET and PETG are common for clear bottles and some jars. They offer rigidity, gloss and good barrier properties. Their surface energy is higher than PP/PE, so adhesion can be somewhat easier, but the smooth surface can highlight any print defects. PETG, in particular, is popular for thicker, glass-like designs in prestige skincare. Here, ink choice and curing must be balanced against any stress-cracking concerns and the thermal limits of the material.
ABS and AS are used for many closures and decorative components. These engineering plastics accept ink well and can deliver very crisp, high-resolution prints, but they may sit on top of other processes like plating, coating or metallization. The ink system has to be compatible with all layers in the stack, not just the base polymer.
In practice, we look at your bottle or component material, your artwork, your target markets and any special requirements (such as alcohol resistance) before we recommend an ink system. The right answer for a PET toner bottle with a black logo is not necessarily the same as for a matte PP shampoo bottle with a full-wrap white print.
Surface pretreatment and why it matters
For many plastic bottles and jars, especially PP and PE, surface pretreatment is not optional. The surface coming out of injection or blow molding can be relatively inert and slightly contaminated with mold release agents or process residues. That is not a good foundation for adhesion.
Flame treatment and corona treatment are two common ways to activate the surface. Both essentially raise the surface energy of the plastic and remove light contamination so the ink can wet out and anchor itself more effectively. Without this step, an ink system that looks perfect on paper can fail a simple tape test or alcohol rub on a real bottle.
Pretreatment needs to be stable and repeatable. If the treatment level drifts, you can see variation in gloss, color density or adhesion within the same batch. That is why screen printing lines for packaging usually integrate pre-flame or corona stations directly before the print heads rather than relying on separate, manual processes.
Choosing screens and mesh counts for packaging artwork
Screens are not all the same. Mesh count, thread diameter and stencil thickness all affect how much ink passes through and how fine the printed detail can be. For packaging, the goal is to balance legibility and coverage.
Bold logos and solid areas often use lower mesh counts and thicker stencils so the color appears rich and even, even on textured or tinted surfaces. Fine text and thin lines benefit from higher mesh counts and carefully controlled stencil thickness. If the mesh is too coarse, tiny letters can fill in or edges can look rough.
This is one reason we like to see artwork early. When we know your target font sizes, line weights and print area, we can suggest realistic minimums and adjust the screen specification accordingly. It is much easier to tweak a line weight or font size in the design phase than to fight a marginal feature on press.
When you get screens, inks and pretreatment working together, decoration stops being a risk and starts behaving like any other controlled step in your process. If you want a broader overview of how we build bottles and jars before decoration is even specified, explore our manufacturing capabilities.
When Screen Printing Is (and Isn’t) the Right Choice
Screen printing is a powerful tool, but it is not the only way to decorate plastic packaging. Choosing it by default for every project can lead to unnecessary cost or complexity. A more helpful approach is to map your project to the strengths and limits of each process.
For a handful of simple, solid-color designs ordered in tens or hundreds of thousands of units each year, screen printing lines up very well. Once set up, the process runs efficiently, and the per-unit cost is low. For brands that will reorder the same packaging many times, the upfront investment in screens pays off over the long run.
On the other hand, if your brand lives on small runs and frequent art changes—such as seasonal editions, subscription lines with monthly designs, or highly localized SKUs—digital print labels or sleeves may be more practical. They allow you to change the design without paying for new screens each time and can combine variable data, small text and photographic images more easily than screen printing.
Here is a simplified way to think about it:
| Scenario | Recommended approach | Why it often works best |
|---|---|---|
| 10,000–100,000+ units per SKU, 1–3 solid colors, simple logo/text | Screen printing on bottles/jars | Low unit cost, robust print, strong shelf impact |
| <5,000 units per SKU, many SKUs or languages | Digital label or shrink sleeve | No screen cost, easy artwork changes, full-color capability |
| Premium logo + small metallic accent | Screen printing plus hot stamping | Combines tactile print with metallic highlight |
| Very detailed illustration or photographic imagery | Digital or offset-printed label / sleeve | Better for gradients and complex images |
In practice, many projects combine processes rather than relying on just one. A brand might screen print the main logo and mandatory text directly on the bottle, add a hot-stamped emblem or ring for a metallic accent, or use a spray coating to create a frosted base and then print a single-color logo on top. Screen printing is generally the best fit when you have solid logos, simple typography and a reasonable number of SKUs that will run more than once; once you move into photographic artwork, full-bleed gradients, very fine variable data, very high coverage or tight 360° registration, labels, sleeves or other methods usually make more sense. If you are not sure which mix suits your volumes and channels, a short discussion with our team—and a look at our decoration & surface finishing capabilities—will quickly point you toward the right route.
Design Guidelines for Screen Printing on Curved Plastic Packaging
Good design for screen printing is not just about aesthetics. It is about matching creative intent to the realities of ink, mesh and curved plastic. When artwork respects those constraints, the printing process runs smoother, defects drop and the final result looks the way it was intended.
Fonts, linework and minimum sizes
Tiny, elegant typography may look beautiful on a monitor, but it does not always survive the transition onto a curved plastic surface. Ink has to pass through a mesh and bridge over micro-textures and curvature, so ultra-fine details tend to soften.
As a rule of thumb, we encourage brands to keep body text at a size where a typical consumer can read it comfortably at arm’s length. That often translates to a minimum line thickness and x-height that we can confirm once we see your artwork and pack dimensions. Very thin serifs or hairline strokes are risky candidates for key information such as product names or shade names. If you love a delicate font, consider reserving it for larger logo text and using a more robust face for small copy.
Reverse text—light letters knocked out of a solid dark area—deserves special attention. On a screen print, the light “letters” are unprinted plastic, surrounded by solid ink. If the letters are too small, they can partially fill in or look fuzzy. For critical regulatory text, we usually advise avoiding tiny reverse text and instead printing dark text on a light background.
Designing for curves and 360° layouts
Curved and oval bottles make for striking shelf presence, but they come with geometry. When you place artwork too close to a sharp curve, shoulder or base radius, you increase the chance of distortion. The squeegee and screen can no longer contact the surface at an ideal angle, and the ink deposit can become uneven.
A practical way to handle this is to define a “printable area” on the bottle. That area sits on the main body panel where curvature is gentle and consistent. Within that zone, we can maintain good contact and registration. Above and below it are keep-out zones for complex print. Simple marks like tiny fill level indicators or discrete symbols can sometimes live closer to curves, but large logos and text blocks are better kept inside the main panel.
For 360° designs, such as patterns that wrap around the entire bottle, you also need to consider where the seam will land. On a round bottle, there will be a start/stop point. Planning that seam to sit at the back or under a label area avoids an obvious visual break on the front. On oval bottles, full 360° screen prints may not be practical at all, and a front-and-back split layout might make more sense.
Managing color counts and special effects
Every ink color in a screen print generally requires its own screen, set-up and registration. Adding colors is not free. At some point, the added complexity and cost of managing four or five spot colors on a curved bottle can outweigh the aesthetic gain.
We usually encourage brands to keep screen-printed designs on plastic packaging to a focused palette—often one to three colors. If your brand system is built around many hues, one approach is to use screen printing for the core brand mark and essential information, and use other elements (caps, secondary packaging, labels on the back) to introduce additional color.
Gradients and photographic images are also challenging for traditional screen printing on bottles and jars. While halftone techniques exist, they increase set-up complexity and may not give the smooth look designers expect. When gradients or complex imagery are central to the concept, we often recommend exploring a label, sleeve or digital print for that element while keeping screen printing for simpler, high-impact components.
A short artwork review before you finalize files can prevent a lot of rework. When we see the bottle drawing and artwork together, we can point out potential issues and suggest adjustments that retain the spirit of your design while making sure it prints reliably.
How We Test Screen Printed Packaging for Durability and Safety
A screen print that looks good on the first day but fails in use is not a success. To avoid that, we run a combination of adhesion, resistance and visual checks that reflect how your packaging will actually be handled in the field. The exact plan can vary by project and market, but the principles are similar.
Adhesion and rub tests
Adhesion tests check how well the ink film bonds to the substrate. One common method uses an adhesive tape pulled sharply from the printed area. If ink lifts with the tape or flakes along the edges, adhesion is inadequate for most cosmetic applications. For projects that will face heavy handling or friction, we use stricter acceptance criteria.
Rub tests simulate repeated contact. Dry rub tests involve rubbing a printed area with a clean cloth or finger a specified number of times, then inspecting for color transfer or gloss changes. Wet rub tests introduce water or a mild detergent solution to mimic bathroom use. When alcohol-containing products are involved—toners, facial mists—an alcohol rub test is often added: a swab soaked in alcohol is wiped over the print for a defined number of strokes, and we check for smearing, fading or loss of detail.
Each of these tests gives us a different view into how robust the ink system is on your chosen material once cured under your process settings.
Environmental and use-condition tests
Cosmetic packaging experiences temperature swings, humidity and occasional impacts. For some projects, we use environmental tests to see how screen printing holds up under these conditions. That can include simple high-temperature and low-temperature holds, humidity exposure or thermal cycling between hot and cold conditions.
In bathroom applications, constant exposure to steam and splashes can stress both the plastic and the print. To simulate this, we may store printed bottles in controlled hot and humid environments for a defined period, then check for adhesion loss, color shift or other defects. If your product will travel in long supply chains or face e-commerce distribution, additional handling or transit simulation may be added on the packaging system level.
The goal is not to over-test everything, but to align the test plan with the actual risks of your channel and product. A body wash sold mainly in supermarkets in a single climate may only need a basic set of verifications. A prestige serum line shipped globally through multiple temperature zones could justify a broader protocol.
Visual inspection and defect criteria
Even when adhesion and rub performance are good, visual defects can limit yield or harm brand perception. During and after printing, we inspect for pinholes, missing strokes, registration issues, color variation and contamination such as dust or fibers trapped in the ink.
Clear, shared defect criteria are important. A tiny pinhole in an uncritical background area may be acceptable, while a similar defect in a logo or claim could trigger rejection. For ongoing projects, we can align our internal standards with your brand’s specifications or retailer requirements, so “acceptable” means the same thing to everyone involved.
When a project has specific compliance or safety expectations, we can also coordinate with your ink supplier and internal regulatory team. Many converters and ink makers align their systems with industry frameworks such as the EuPIA Guideline on Printing Inks applied to Food Contact Materials or related guidance, even for non-food cosmetics, as part of a broader risk management approach.
Cost, MOQ and Lead Time: What to Expect
Screen printing adds value, but it also adds complexity and cost compared to a plain, undecorated bottle. Understanding the main cost drivers helps set realistic expectations and avoids surprises when you receive quotes.
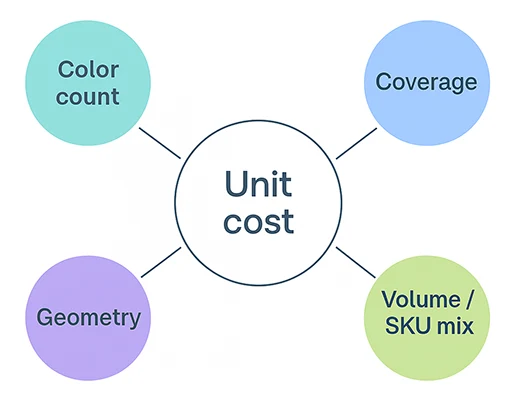
The first driver is color count and coverage. Each spot color requires its own screen, set-up and registration. A single white logo on the front of a bottle is far simpler than a four-color wrap with fine registration. Large solid areas consume more ink and can be more sensitive to slight process variations. When you control color count and coverage thoughtfully, you often open up more economical options.
The second driver is bottle or component geometry. Simple round bottles with a well-defined print panel run quickly and efficiently. Oval, highly contoured or asymmetrical packs may need slower speeds, more complex fixtures and more frequent checks. That extra handling time shows up in the finished cost. When you have flexibility during the industrial design phase, choosing shapes that are print-friendly can save money over the life of a product.
The third driver is volume and SKU complexity. High volumes on a small number of stable SKUs are ideal for screen printing. Small runs, frequent artwork refreshes and many low-volume SKUs drive up the relative cost of screen making and set-up. In those cases, a mix of screen printing for core items and other processes for limited editions can be a smart compromise.
Lead time is also worth planning. There are two layers to consider: the packaging itself (molding, any coatings or coloring) and the decoration. Screen printing introduces additional steps for screens, ink approvals, machine scheduling and any pre-production samples you need to sign off. For a stable repeat job, the decoration step can often be folded smoothly into your overall lead time. For a completely new project with novel materials or demanding artwork, it is wise to allow time for trials and adjustments before committing to mass production.
If you are unsure how all these factors will play out for your project, sharing early details—target launch dates, forecast volumes, SKUs and artwork direction—allows us to estimate realistic lead times and suggest where design choices can free up time.
Sustainability and Compliance Considerations for Screen Printing
Sustainability and compliance questions no longer sit in the background of packaging decisions. Inks, coatings and decorative processes are part of how a pack is evaluated, not just the base plastic. Screen printing can support sustainable strategies when it is specified carefully.
Recyclability and design for recycling
From a recyclability standpoint, the main levers for screen printing on plastic bottles and jars are coverage, color and removability. A small logo and a few lines of text in a dark color usually have limited impact on sorting and recycling. Heavy, full-coverage prints in strong colors can complicate things, especially on clear packs designed for high-value recycling streams.
Emerging deinking technologies are being developed for UV-curable inks on hard plastics, allowing the printed layer to be removed during recycling and the plastic to be reused in more demanding applications. For example, some systems apply a deinking coating that lets UV-cured inks be washed off and the plastic recovered in a clearer state. These technologies are still evolving, but they point toward a future where decorative layers and recycling can coexist more comfortably.
When recyclability is a core goal, we discuss not just the ink system but also how much of the surface should be printed, what colors to use, and how screen printing interacts with other elements such as labels or coatings. That conversation is easier when it happens at the start of a project, not after artwork is locked and molds are cut.
Ink selection and industry guidelines
While cosmetics are not regulated in exactly the same way as food packaging, many brands take cues from frameworks built for food-contact materials. Industry bodies such as EuPIA provide guidance on ink formulation, risk assessment and excluded substances for printing inks used on the non-food-contact side of packaging.
Working with ink systems that respect policies like the EuPIA Exclusion Policy for printing inks and related products can help brand owners avoid known problematic substances and anticipate future regulatory trends. When you have your own internal lists of restricted chemicals or retailer-specific requirements, we can coordinate with ink suppliers to choose suitable products or to document compliance in a way that fits your process.
For projects that touch both cosmetic and quasi-food categories—such as lip care products or packaging that may be repurposed by consumers—these discussions become even more important. Getting ink selection, documentation and testing aligned up front reduces the risk of late-stage compliance questions.
VOCs, curing and energy use
Screen printing inks for plastic packaging are typically either solvent-based or energy-curable (UV/LED). Solvent-based systems release volatile organic compounds (VOCs) during drying, which has implications for worker exposure, emissions control and local regulations. Energy-curable inks, by contrast, are often described as zero-VOC or 100% solids because they do not contain carrier solvents that evaporate during curing.
However, “more sustainable” is not just a matter of counting VOCs. UV-curable systems require energy and specialized equipment for curing. Their overall footprint depends on factors such as energy mix, curing efficiency and how the printed pack is handled at end of life. Articles that explore the sustainability of energy-curable inks and coatings make this point clearly: you have to consider the full system, not a single metric.
At the same time, resources that ask what is the most sustainable ink highlight that context matters: substrate, printing method, curing, and disposal path all influence the right choice. For many cosmetic packaging projects, energy-curable inks offer a practical balance of durability, process control and emissions, especially when paired with efficient LED curing and thoughtful pack design.
Applications in Cosmetic and Personal Care Packaging
Screen printing shows up across nearly every segment of beauty and personal care. The specific way it is used changes with the product and branding, but the underlying reasons are similar: clarity, impact and durability.
In skincare, screen printing is often used to keep minimalist packs readable and on-brand. A frosted airless pump bottle with a simple brandmark and product name in a single color can carry a premium feel without a label. Volume, usage instructions and batch codes can be added in smaller text, still within a controlled print area. When you see a family of moisturizer, serum and eye cream in matching bottles on a shelf, screen printing is frequently the technique behind that consistency.
Haircare and bodycare lines often need bolder statements. Shampoos and conditioners share bathrooms with multiple other products. Clear, high-contrast labels printed directly on opaque or translucent bottles make it easy to tell which is which at a glance. Screen printing’s ability to lay down thick, opaque inks helps light colors stand out even on dark or tinted plastics.
In more specialized areas—men’s grooming, sun care, spa products—screen printing can support distinct brand languages. Matte black bottles with crisp light ink, soft-touch coated packs with a subtle gloss logo, or translucent bottles with a single metallic element are all realistic scenarios. Many of these packs use a combination of airless pump bottles, cosmetic bottles, cosmetic jars and cosmetic tubes with a shared screen-printed system so the line looks cohesive while each SKU still has its own identity.
For some brands, screen printing on closures and components—such as pump actuators or jar lids—adds a final layer of detail. Even a single small icon or logo on the top of a cap can reinforce brand recognition every time the product is used.
How to Brief UKPACK for a Screen Printing Project
Good outcomes start with good briefs. When you involve your manufacturing partner early and share the right information, screen printing becomes a predictable part of your packaging program instead of a source of last-minute surprises.
To help us assess your project quickly and accurately, it is useful to have the following points ready:
- Pack type and material – What are we printing on? An airless bottle, a standard bottle, a tube, a jar, a closure? Is it PP, PE, PET, PETG, ABS, AS or a specific blend?
- Finish and color of the base pack – Is the bottle tinted, frosted, coated or metallized? Base color and finish strongly influence ink choice and coverage.
- Artwork and color requirements – How many spot colors? Any gradients or special effects? Do you have brand color references (Pantone or similar)?
- Print area and layout – Do you have a bottle drawing or preferred print window? Will the design wrap around or sit on one panel?
- Volumes and SKU mix – Estimated annual usage and per-order quantities for each SKU. Are we talking about a long-running core line or a short-lived campaign?
- Target markets and regulatory considerations – Where will the product be sold? Do you have any internal or retailer-specific requirements on inks, VOCs or restricted substances?
- Performance expectations – Are there specific tests the print must pass (alcohol rub, tape test, humidity exposure) beyond a standard cosmetic packaging baseline?
With this information, we can quickly tell you whether screen printing is the best option or whether a different process might fit better. If screen printing is the right choice, we can propose a realistic combination of materials, ink systems, pretreatment and QC checks, and outline a timeline from first samples to mass production.
If you do not yet have finalized artwork or bottle drawings, we can work from preliminary sketches and concepts. Using our 3F Services, we help brands refine designs, choose feasible print areas and avoid common pitfalls before decisions are locked in tooling and print plates.
FAQ: Screen Printing on Plastic Packaging
Q1. Can you screen print on PP and PE bottles?
Yes, screen printing on PP and PE bottles is common in cosmetic and personal care packaging, but it requires the right preparation and ink. These materials have low surface energy, so they usually need flame or corona pretreatment immediately before printing to create a receptive surface.
We then pair that treated surface with an ink system designed for low-energy plastics and cure it under controlled conditions. When pretreatment, ink choice and curing are aligned, PP and PE bottles can deliver stable adhesion and good long-term appearance, even in demanding bathroom environments.
Q2. How many colors can you screen print on a plastic bottle?
There is no strict technical limit to the number of spot colors, but each one adds complexity. In practice, many beauty and personal care packs use one to three colors for screen printing on bottles and jars. That range offers strong branding and legibility while keeping set-up time, registration and cost under control.
If your design truly needs more colors or special effects, we look at how those can be achieved efficiently. Sometimes that means combining screen printing with hot stamping, coatings or labels, rather than forcing everything into a single, complex screen print.
Q3. Will screen printing peel or fade in the shower?
A properly specified and tested screen print should not peel or fade under normal shower and bathroom usage during the product’s life. We select ink systems, pretreatment and curing conditions with this environment in mind, and we validate them with adhesion and rub tests, including wet and alcohol rub where relevant.
That said, extreme conditions—such as prolonged soaking in strong solvents or aggressive cleaning chemicals—are outside the design envelope for most cosmetic packs. When a product is likely to encounter unusual stresses, we can design a specific test plan and, if necessary, adjust the ink system or decoration method accordingly.
Q4. Is screen printing suitable for small orders?
Screen printing involves fixed costs for screens and set-up, so very small orders or one-time micro-runs are rarely the most economical match. For one-off or very low-volume projects, digital print labels or sleeves often make more sense because they spread those fixed costs differently.
However, “small” is relative. If a launch will be repeated and volumes are expected to grow, it may still be rational to start with screen printing so the decoration approach stays consistent as volumes increase. Sharing your forecast and product roadmap allows us to evaluate options and, if needed, propose a staged approach.
Q5. Can you screen print on frosted or coated bottles?
Yes, but the details matter. Frosted, sprayed or coated bottles introduce extra layers between the ink and the base plastic. The ink must adhere to the coating, and the coating must adhere to the plastic. We test that stack-up carefully, especially when multiple processes are involved.
On frosted bottles, screen printing can create striking contrast and a premium feel. On coated or metallized surfaces, it can add color and information without masking the underlying effect. In both cases, we look at adhesion, curing and any potential interactions between processes before locking in a specification.
Q6. Does screen printing affect recyclability of plastic packaging?
Screen printing has some impact on recyclability, but it is only one part of the picture. Light, limited-coverage prints in a few colors are generally compatible with existing recycling streams for many plastic packaging formats. Heavy, full-coverage prints or special-effect inks can complicate certain recycling processes, particularly where a clear or light-colored recyclate is desired.
We address this by controlling coverage, choosing inks with recycling in mind and staying aware of evolving deinking technologies for plastics. When recyclability is a key design goal, we discuss it explicitly at the start of the project so your screen printing specification supports that objective rather than undermining it.
Final Thoughts
Screen printing on plastic packaging sits at the intersection of design, engineering and manufacturing. When it is chosen and specified well, it can deliver clean, durable decoration that reinforces your brand on every bottle and jar. When it is chosen by default or treated as an afterthought, it can become a source of delays, cost overruns and disappointing shelf presence.
The most effective projects treat screen printing as part of a broader packaging system. They align artwork with bottle geometry, match inks to materials and markets, and build in appropriate testing. With those elements in place, you can make confident decisions about when to use screen printing, when to combine it with other decoration methods, and when a different process altogether leads to a better outcome.
If you are planning a new beauty or personal care line—or reworking an existing one—early collaboration with a manufacturer like UKPACK can simplify many of these choices. Share your pack types, artwork direction, volumes and sustainability goals, and we will help you decide where screen printing fits, how to implement it, and what alternatives to consider before you commit to tools, plates and schedules.